5 Common Mistakes to Avoid as a Beginner Photographer |  |
- 5 Common Mistakes to Avoid as a Beginner Photographer
- Crocodiles vs. Hippos: A Battle of Epic Proportions
- Using Found Objects as Light Sources for Photography (Video)
- Interesting Photo of the Day: Bird as Ballet Dancer
- How to Fix Your Editing Mistakes By Using Photoshop CC’s History Panel (Video)
| 5 Common Mistakes to Avoid as a Beginner Photographer Posted: 29 Apr 2014 11:41 PM PDT Photography is a wonderful hobby or career that is accessible to almost anyone who is interested. The great thing about photography is that anyone can pick up a camera and start taking pictures, but if you choose to learn more advanced methods there can be a steep learning curve. Then again, there are a few common pitfalls that you may wish to avoid if you’re just getting started. Gear Everywhere!With all of the photo equipment available, it’s easy to get overwhelmed with all of the possibilities. Tripods, extra lenses, filters, darkroom gear, timers, lights, reflectors – the list is endless. If you don’t have a solid understanding of what you’re able to do with your camera, you’ll never be able to truly master the use of all of the accessories. Start off small with a basic DSLR camera and only one lens. When you feel like you’ve pushed that as far as you can, then start looking for some fancier gear.  “Photography Gear” captured by Mark Sebastian No Backup PlanIn the beginning, it’s common to miss a lot of great shots. In fact, not only will you miss a lot of great photographs, you’re also going to mess up on photos you were able to take. That’s why you should generally take every picture (that you care about) at least twice or at least closely look at the image on the LCD screen to make sure it turned out. This will help teach you about the subtleties of your camera’s inner workings, as well as provide a bit of safety in knowing you won’t miss the important things. Besides, in the day of digital the cost of shooting thousands of images is no more than shooting only ten. Built-In FlashYou don’t need it. An automatic flash will, at best, teach you to ignore complex or difficult lighting situations and will, at worst, ruin your images. You should turn your flash off and get used to working with natural light and your camera’s settings so you can further develop your photography skills. You can take pictures without a flash in almost any environment. All you have to do is be a little creative in how you use the light that’s available. Centered SubjectsContrary to popular belief, you don’t need to put your subjects in the exact center of the frame. This can create unnecessary space in your pictures and make them less interesting. Picture the frame or viewfinder of your camera as a cropping tool so you’ll always compose exactly what you want in your picture. Good framing is something that doesn’t take long to learn and will improve your work for a lifetime.  “Dog & Beach” captured by Ratioshoot (Click image to see more from Ratioshoot.) Point and ShootSimple point-and-shoot cameras with giant LCD screens on the back are certainly tempting, but if you’re hoping to learn about the art of photography and to challenge yourself to improve, you’re probably not going to get anything out of one. Many beginners pick these cameras due to their convenience and affordability, which is absolutely fine if you’re only intending to use it for non-professional or artistic purposes. If you want to understand photographs and the ways in which you can create them, you need to start with the right tool for the job. Overall, these five mistakes are easy to avoid and won’t cause you much harm if you happen to stumble into one now and again. When learning photography, it’s important to establish good habits and skills early on so you can continue to build upon a solid base of knowledge going forward. By regularly taking pictures and avoiding these common pitfalls, you’ll be taking great quality pictures in no time that you’ll be happy to share with others. About the Author: Go to full article: 5 Common Mistakes to Avoid as a Beginner Photographer |
| Crocodiles vs. Hippos: A Battle of Epic Proportions Posted: 29 Apr 2014 04:03 PM PDT When photographer Marc Mol boarded his microlight aircraft in 2011 to fly over Zambia’s South Luangwa National Park, he must have expected to see some amazing sights from his bird’s eye view. He probably didn’t expect to witness this epic battle of beasts as a massive herd of hippos and an equally-massive bask of Nile crocodiles engaged in mortal combat at a watering hole: (for those of you reading this by email, the photo album can be seen here) Since hippopotami and crocodiles share the same watery living environments, clashes between the two species are common, though not at these proportions. Usually these confrontations are singular battles between an opportunistic croc looking to feast on an unsuspecting hippo calf and a protective mother hippo who will gladly fight to the death to protect her own—or between much smaller bands of the animals when the hippos aim to drive the predatory crocs away from young calves. As for who usually wins those battles… crocodiles are 16 foot, 500-pound killing machines who can demolish bone with their jaws just as easily as someone might snap a toothpick. However, despite all of that sheer power, crocodiles aren’t the most dangerous and deadly animal in Africa—hippos are. They might not be able to inflict 3,000 pounds of crushing force per square inch like the crocodile, but hippos’ razor sharp tusks and massive size (measuring 14 feet long and weighing 4 tons) allow them to easily overpower their reptilian neighbors. Still, sometimes underdogs win wars and crocodiles can get the upper hand if their numbers are great enough. In fact, the only casualty from the epic clash witnessed by Mol appears to be a hippo. Go to full article: Crocodiles vs. Hippos: A Battle of Epic Proportions |
| Using Found Objects as Light Sources for Photography (Video) Posted: 29 Apr 2014 02:31 PM PDT At first glance, many objects we see when scouting shooting locations deter us from setting up our gear to take photos. We may find a lot of things unsightly, but in truth, some of them can be used to our advantage. In this short and informative video clip, Joe McNally talks about how you can use found objects to improve your photographs: In McNally’s example, he used a large white truck to reflect his lights off of to create this photo of parkour expert: 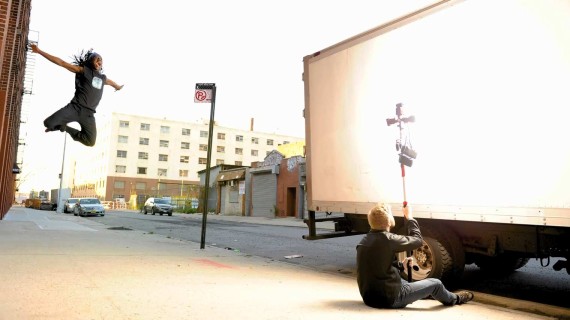 This white truck made a huge light source.
 The bounced light from the truck lit up the parkour artist as he jumped. By having Jonathan run toward the camera, McNally was able to use three speedlights bounced off the side of the truck, effectively turning the truck into a light source that created a light similar to a lightbox. It just goes to show that you shouldn’t nix a location before thinking about how you can use found objects to your advantage. Go to full article: Using Found Objects as Light Sources for Photography (Video) |
| Interesting Photo of the Day: Bird as Ballet Dancer Posted: 29 Apr 2014 12:21 PM PDT As long as people have been taking photos, they have been taking photos of animals acting like humans. There’s something either very funny or very poignant about an animal standing on two legs, shaking hands with its owner, giving off a puzzled expression or, in this case, walking gracefully like a ballerina through someone’s backyard:  This shot is a great example of the rule of thirds. (Via PictureSocial. Click to see larger size.) This surreal moment was captured by Vijay Andi with a Nikon D7100. Dubbed “Ballet Dancer”, the shot was featured on Picture Social and went viral on the site, winning the affection of hundreds of other photographers. Its Zen-like simplicity and adherence to basic artistic principles, like the rule of thirds, makes it a universal winner. Go to full article: Interesting Photo of the Day: Bird as Ballet Dancer |
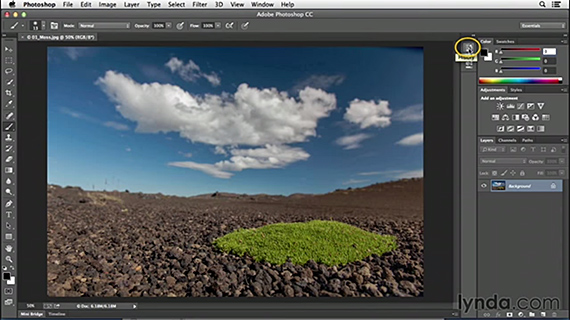
| How to Fix Your Editing Mistakes By Using Photoshop CC’s History Panel (Video) Posted: 29 Apr 2014 10:43 AM PDT The world of digital photography can be mind blowing sometimes, or at the very least, super convenient. With today’s advancements in image editing, it’s almost impossible to lose an original photograph to bad editing. This video shows us how to use the History Panel in Photoshop CC to step back and forth through our editing history: It’s pretty easy to step back and undo an unwanted edit in Photoshop. Most of us just click on Edit, then Undo, or even faster, use the shortcut cmd + z (Mac) or ctrl + z (Windows). That’s great for the last edit made, but what about that edit you made 15 minutes ago that you’ve been doubting? As you make more changes to your image, Photoshop keeps track of everything, each step, all of which can be accessed through the History Panel. If you’re in the Essentials work space, you’ll find the History icon to the top right corner of your image. If you’re in a different work space or can’t see an icon, go to the Window tab at the top of the screen and select History.
Each time you edit the image in any way, a list of steps/changes will appear in the History Panel. Now, if you need to go back in time to any of these previous steps, you can simply click on the one you need, and any change you made after that one will not be visible. If you then make a change while on that step, the next ones down the list will disappear. Essentially, you are starting over from that step. If, however, you want Photoshop to keep track of all steps, no matter if you go back and make another change, you can make it so non-linear history is recorded. You can change these settings by going to the flyout menu on the History Panel icon and choosing History Options. Here, select Allow Non-Linear History and OK. Now, if you make an edit to your image, that step will be added to the existing list, so you can still move back through all of those different states. You can also use the Step Backward and Step Forward keyboard shortcuts to move through your history. How to Step Backward in PhotoshopMac: cmd + opt +z Windows: ctrl + alt +z How to Step Forward in Photoshop |
| You are subscribed to email updates from PictureCorrect Photography Tips To stop receiving these emails, you may unsubscribe now. | Email delivery powered by Google |
| Google Inc., 20 West Kinzie, Chicago IL USA 60610 | |
No comments:
Post a Comment